How to Polish Concrete Floors

Polishing can enhance the appearance of your concrete floor, reduce maintenance needs, and even extend its predicted lifespan. And grinding and polishing concrete floors typically costs less than covering the same square footage of space with wood, ceramic, or even vinyl flooring.
However, like any process, you’ll need to have the right equipment and follow the correct steps to achieve long-lasting results. In this overview, we’ll highlight all of the equipment and steps needed to successfully complete a concrete polishing project.
Equipment You’ll Need
To properly grind and polish concrete floors, you’ll need the following tools and equipment:
- Joint Cleanout/Repair Saw
- Shop Vac/Wet-Dry Vac
- MOHS Hardness Pick
- Concrete Densifier
- Protective Gloves
- Concrete Sealer
- Diamond Blade
- Burnishing Pad
- Safety Goggles
- Earplugs
- 2-Part Concrete Epoxy & Concrete Scraper
- Roller or Sprayer
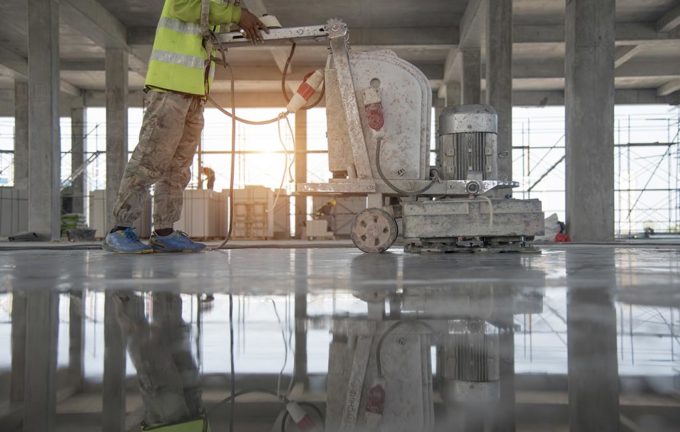
- Concrete Grinder/Polisher
- Diamond Discs in Correct Grit Size
Tip on diamond discs: You can take the grit number higher depending on the shine level you aim for. However, when the 400-grit is used properly, it is high enough to get most concrete shining like glass.
Now, let’s jump into some step-by-step instructions for polishing concrete floors.
Step 1: Removing Cracks & Defects
The first step is to fill in cracks or expansion joints. Use a shop vac first to suck out any dirt and debris hiding there.
Then use a concrete repair saw (attached to your vacuum) to cut down the path of the joint, completely removing any remaining debris and leaving fresh concrete behind. Next,
- Overfill the gap with a two-part concrete epoxy (it will most likely be messy).
- Allow the epoxy resin to dry completely.
- Scrape away the excess dried epoxy even with the surface.
You also need to address other surface repairs. The goal is to provide a solid, smooth, defect-free surface before grinding and polishing.
Step 2: Grinding & Smoothing Surface
Once you’ve repaired your surface, it’s time to smooth it down. For this step, you’ll need your diamond discs and grinder. Diamond discs come in a range of hardness ratings, and you have to match the hardness of the disc with the hardness of the concrete. Softer diamond discs are used on harder concrete, and harder diamond discs are used on softer concrete.
If you aren’t sure about the hardness of your concrete, purchase a MOHS hardness pick. Knowing the hardness is critical because choosing the wrong disc hardness can lead to disc glazing and ruination!
Once you have the proper diamond discs for the job at hand, follow these key steps (Note: You would generally start with a 40-grit and work your way up to the desired grit size:
- Make a slow, thorough perimeter pass first.
- Proceed to the central area.
- Move very slowly and methodically.
- Let the grinder do the grinding. All you have to do is guide it.
After making a 100% total surface pass with the 40-grit discs, vacuum the area thoroughly, and switch to 80-grit discs. Repeat the process with 100- and 150-grit discs, switching your work paths perpendicularly with each grit changeup.
Tip: Keep an open eye for resin burning, which can occur when your diamond discs get hotter than 220 degrees Fahrenheit. It’s wise to mist a little water in front of the grinder’s path to help to keep the discs cool.
Step 3: Applying a Concrete Densifier
Unsealed concrete is especially porous and has interconnected air passages that suck up moisture and contaminants and cause staining. A concrete densifier seals those tiny pores, eliminates dusting, adds significant strength, and protects the burnishing pad from impact damage.
When choosing a densifier to meet your needs, consider the following:
- Sodium densifiers are generally less expensive to purchase,
- Lithium densifiers create the shiniest results.
- Potassium densifiers produce the most durable, low-maintenance results.
- Silicate densifiers are the easiest to use and create glass-like finishes.
- Low- and No-VOC densifiers are the most environmentally friendly/safest but must be reapplied annually.
Tip: If you’re working with soft concrete, apply your densifier after the 80-grit grinding pass. If your concrete is extra hard, apply the densifier after the 400-grit pass.
Step 4: Polishing
Before you move on to the fine grinding/polishing stage of your project, ensure that the concrete is extra clean. Any small faults you leave now will become increasingly magnified with the subsequent steps.
Once your surface is entirely clean, smooth, and free of defects, it’s time to polish it.
- “Lap” your pad with 200-grit discs.
- Thoroughly clean the floor, removing all dust.
- Allow the floor to dry completely.
- Meticulously inspect the floor, feeling with your fingers to ensure a flawless surface.
- Lap the pad with the 400-grit polishing discs and repeat the process until you have achieved the degree of shine you’re targeting.
- Clean any remaining dust and debris.
Step 5. Sealing & Final Polish
After the first polish, you’ll want to apply a concrete polishing compound or sealer. Two thin coats are typically better than one thick coat. Apply the product according to manufacturer instructions, then let it dry.
Once the sealer has dried, lap the floor with the 400-grit discs or step up the grit size. Diamond grinding and polishing discs can be pricey, but if you want them, they’re available in grits as high as 3000. Still, a 400-grit finish can be very shiny and attractive when done properly.
After the final polishing, you’re done! To maintain a consistent shine, you will need to re-polish your concrete floor every three or four years.
Reach Out to G&G Concrete Today
While grinding and polishing concrete can yield stunning results, it can be tricky for many DIYers. It’s also labor-intensive, especially for those who lack experience and a proven protocol for success. Furthermore, it’s easy to damage concrete during the process, especially if you are unsure of its hardness or the best type of grinder to use in your unique scenario.
Let G&G Concrete & Construction take the guesswork out of polishing concrete floors and ensure professional results that you’ll love! Reach out to our friendly and supportive team today with questions or to request services.


